WhisperLiveKit - 实时语音识别
WhisperLiveKit 演示
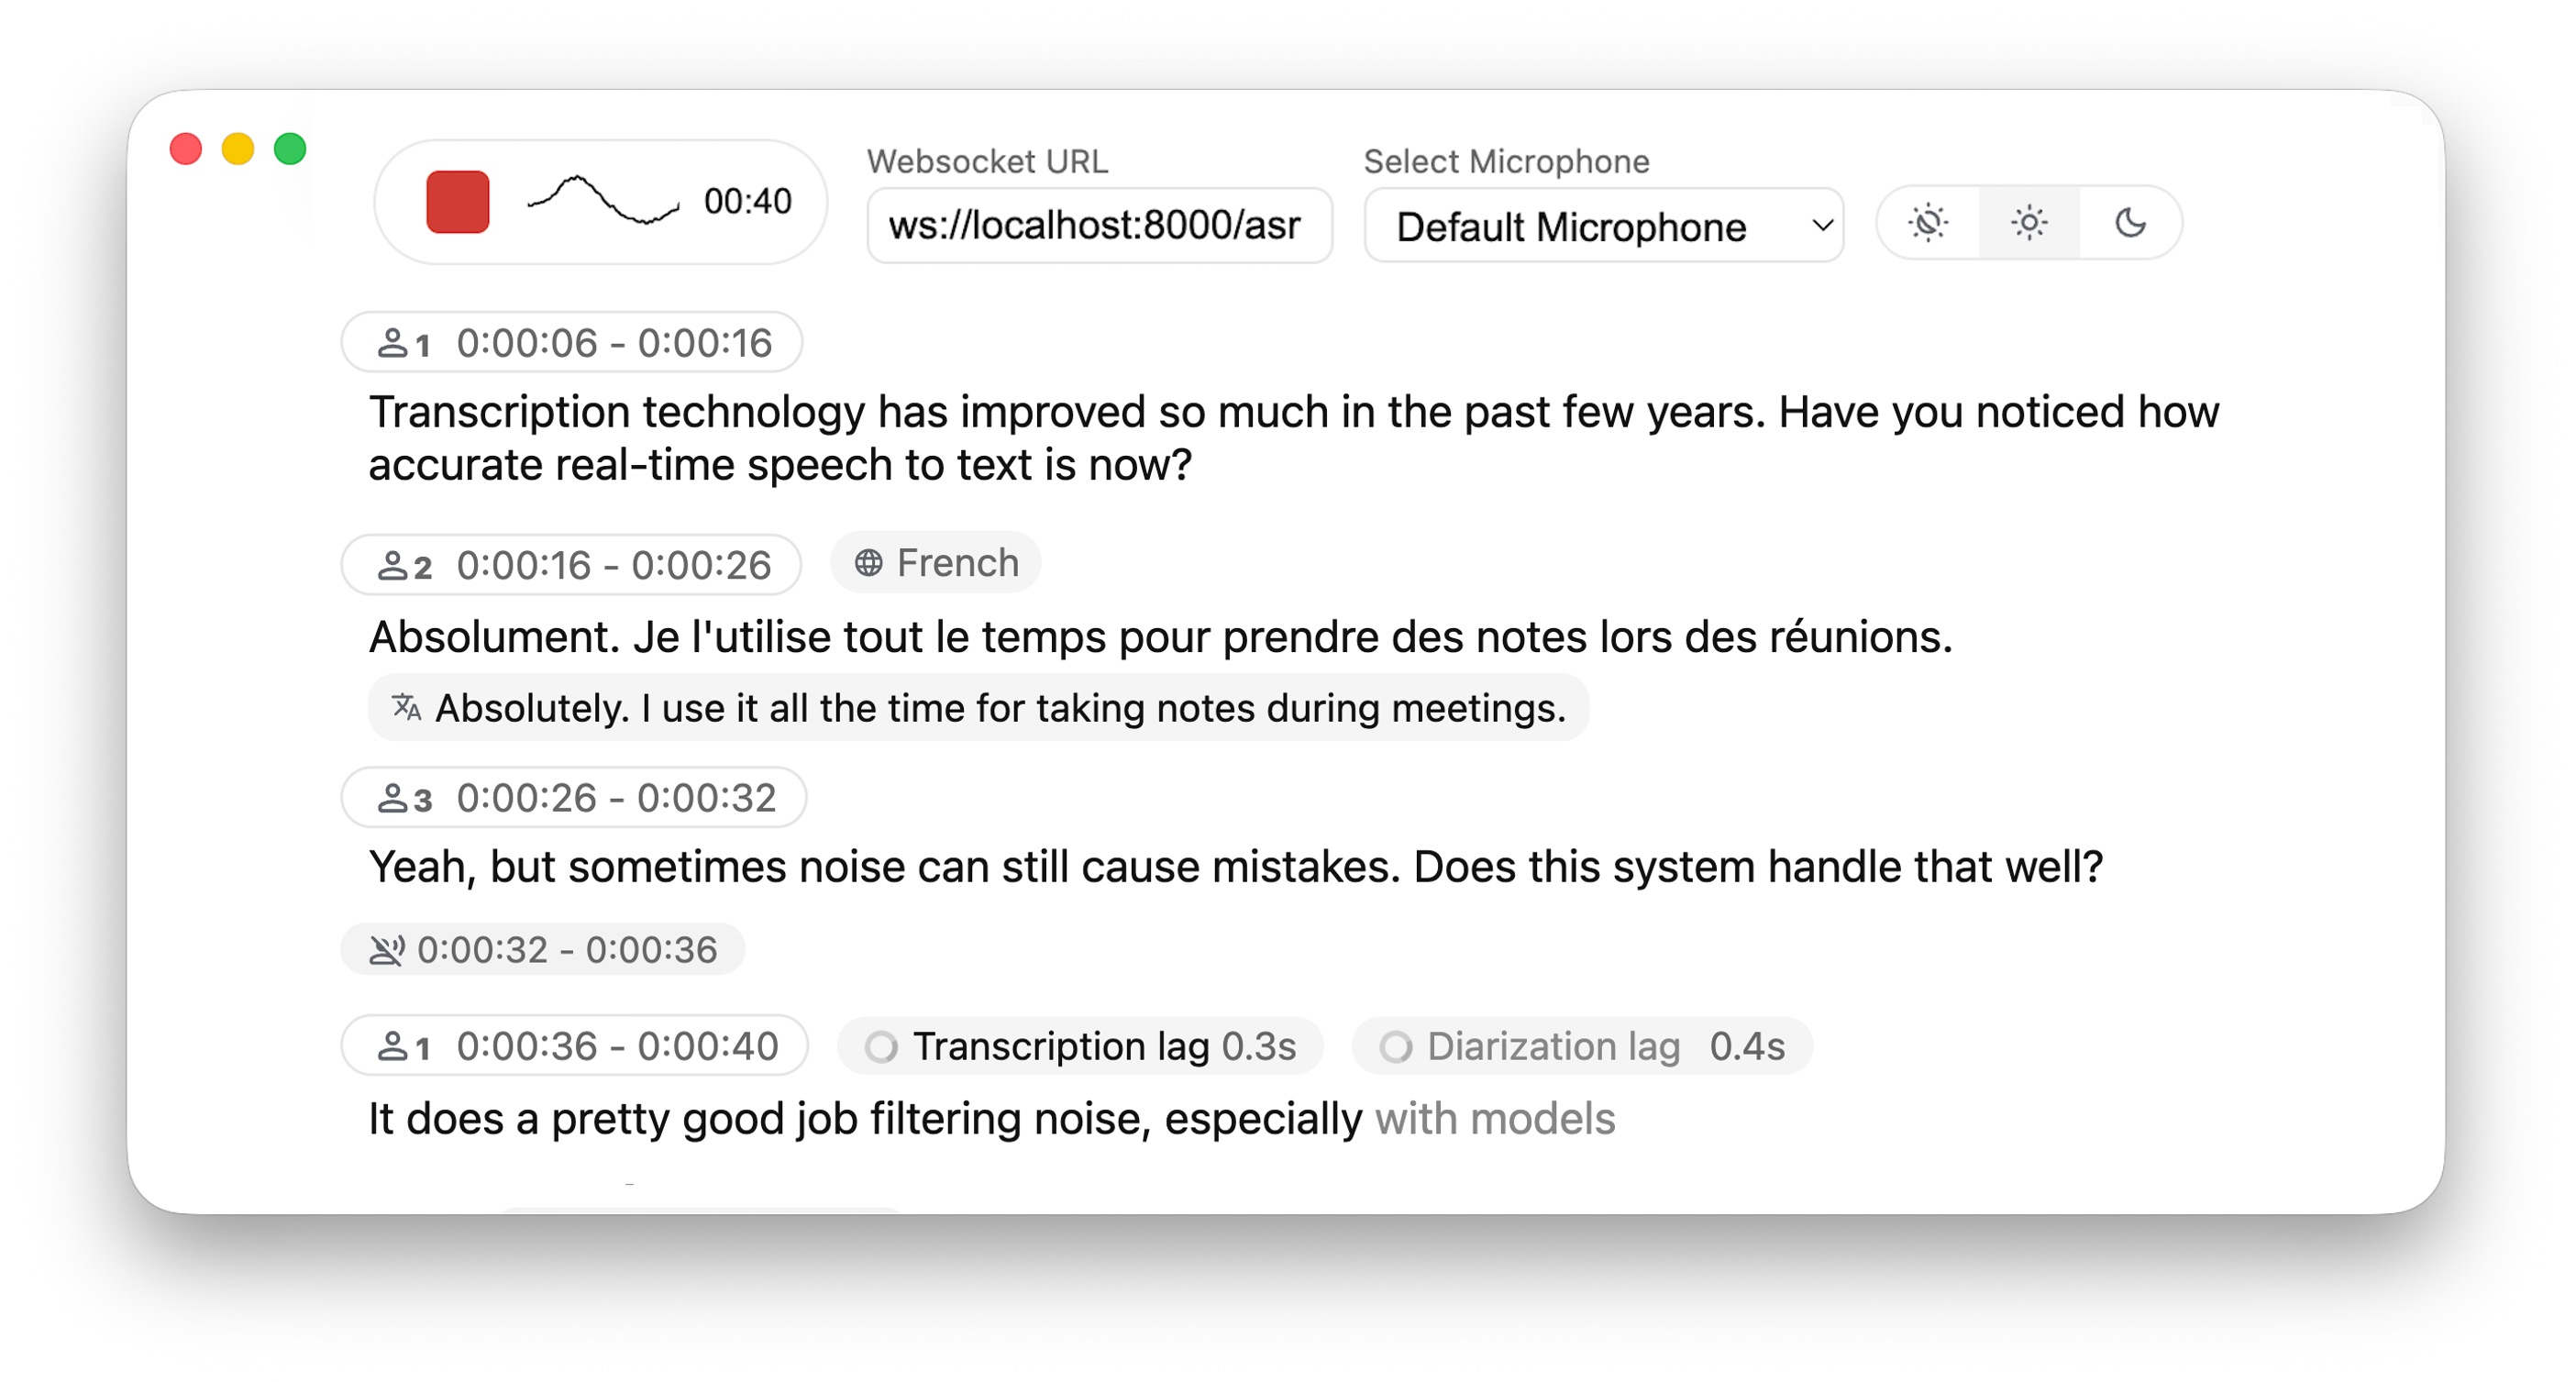
实时、完全本地化的语音转文本,带说话人识别功能
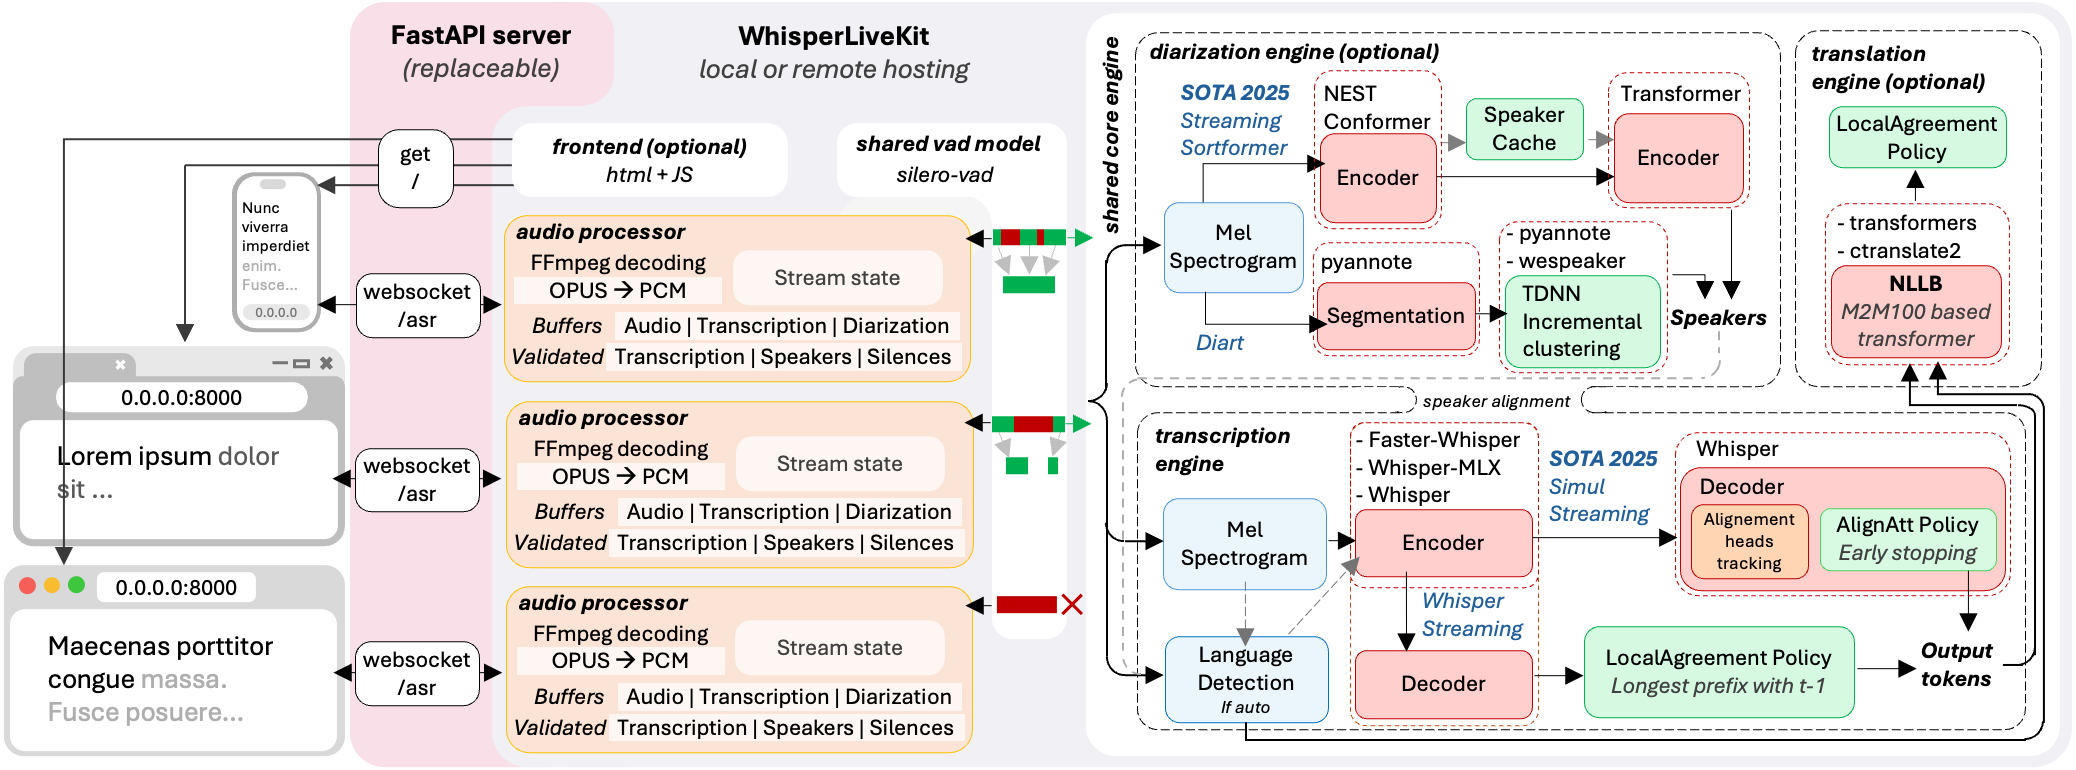
WhisperLiveKit 架构
构建 WhisperLiveKit
运行 pytorch 容器 - CUDA (JetsonThor)
docker run -it \
    --ipc=host \
    --net=host \
    --runtime=nvidia \
    --name=whisperlivekit \
    -v ~/.cache:/root/.cache \
    -v /models:/models \
    nvcr.io/nvidia/pytorch:25.10-py3 \
    bash
生成证书
mkdir -p .cert && cd .cert

openssl req -x509 -newkey rsa:4096 \
  -keyout key.pem \
  -out cert.pem \
  -days 365 \
  -nodes \
  -subj "/C=CN/ST=ShanDong/L=JiNan/O=LNSoft/OU=LNSoft/CN=localhost/emailAddress=wjj@163.com"
参数解释:
-x509:生成自签名证书-newkey rsa:4096:新建 4096 位 RSA 密钥-keyout key.pem:输出私钥文件-out cert.pem:输出证书文件-days 365:证书有效期 365 天-nodes:不加密私钥(即无需输入密码)-subj:直接指定证书主题,跳过交互式输入
验证生成结果
openssl x509 -in cert.pem -noout -subject -dates
subject=C = CN, ST = ShanDong, L = JiNan, O = LNSoft, OU = LNSoft, CN = localhost, emailAddress = wjj@163.com
notBefore=Oct 26 11:22:28 2025 GMT
notAfter=Oct 26 11:22:28 2026 GMT
安装依赖
安装 ffmpeg
- Ubuntu
apt update
apt install -y ffmpeg
- macOS
brew install ffmpeg
安装 torchaudio
- Ubuntu
克隆 torchaudio 仓库,并切换到 2.8 分支
git clone -b release/2.8 https://github.com/pytorch/audio.git
cd audio
禁用所有 C++ 扩展(强制纯 Python 版)
你当前 NVIDIA torch 缺少大量 ABI 文件,大部分 C++ 扩展都不能编译,所以必须禁用:
export BUILD_TORIO_PYTHON_EXTENSION=0
export BUILD_SOX=1
export USE_CUDA=0
export USE_STABLE_ABI=0
编译安装
python setup.py install
- macOS
pip install torchaudio
安装 whisperlivekit
- Ubuntu
# 不加 --no-deps 就会安装 torchaudio 和 torch 的依赖
pip install whisperlivekit --no-deps
pip install tiktoken fastapi uvicorn websockets
❌ 安装成功,但是启动服务器时报错:
# pip install faster-whisper # 有问题
- macOS
pip install whisperlivekit -i https://pypi.tuna.tsinghua.edu.cn/simple
pip install -U ml_dtypes -i https://pypi.tuna.tsinghua.edu.cn/simple
安装 certifi
certifi 是一个提供最新 CA 根证书(Certificate Authority bundle)的 Python 包。它让 Python 能正确验证 HTTPS 站点是否可信。
pip install --upgrade certifi -i https://pypi.tuna.tsinghua.edu.cn/simple
检查 CUDA 是否可用
python -c "import torch; print(torch.cuda.is_available())"
可选依赖
| Optional | pip install |
|---|---|
| Speaker diarization | git+https://github.com/NVIDIA/NeMo.git@main#egg=nemo_toolkit[asr] |
| Apple Silicon optimizations | mlx-whisper |
| Translation | nllw |
| [Not recommanded] Speaker diarization with Diart | diart |
| [Not recommanded] Original Whisper backend | whisper |
| [Not recommanded] Improved timestamps backend | whisper-timestamped |
| OpenAI API backend | openai |
参考 参数与配置 了解如何使用它们。
安装可选依赖
pip install "git+https://github.com/NVIDIA/NeMo.git@main#egg=nemo_toolkit[asr]"
- Ubuntu
❌ 还是失败了。(–diarization-backend diart)
# 不加 --no-deps 就会安装 torchaudio 和 torch 的依赖
pip install diart pyannote_audio pyannote-core pyannoteai_sdk pyannote-metrics pyannote-database --no-deps
pip install rx optuna sounddevice websocket-server
- macOS
pip install mlx-whisper -i https://pypi.tuna.tsinghua.edu.cn/simple
运行 WhisperLiveKit 服务器
whisperlivekit-server --model small \
    --host 0.0.0.0 --port 8000 \
    --ssl-certfile .cert/cert.pem \
    --ssl-keyfile .cert/key.pem \
    --language zh
model 参数
- tiny.en
- tiny
- base.en
- base
- small.en
- small
- medium.en
- medium
- large-v1
- large-v2
- large-v3
- large
- large-v3-turbo
启用语音分离
# Diarization and server listening on */80
whisperlivekit-server --model small \
    --host 0.0.0.0 --port 8000 \
    --ssl-certfile .cert/cert.pem \
    --ssl-keyfile .cert/key.pem \
    --diarization \
    --language zh
运行 WhisperLiveKit 客户端
浏览器访问 https://192.168.55.1:8000
构建 WhisperLiveKit 镜像
手动构建
docker commit whisperlivekit wangjunjian/whisperlivekit
运行镜像
docker run -it --rm \
    --ipc=host \
    --net=host \
    --runtime=nvidia \
    -v ~/.cache:/root/.cache \
    wangjunjian/whisperlivekit \
    whisperlivekit-server --model small \
    --host 0.0.0.0 --port 8000 \
    --ssl-certfile .cert/cert.pem \
    --ssl-keyfile .cert/key.pem \
    --language zh \
    --diarization
自动构建
- 设备: Jetson Thor (
agx-thor-2) - 位置:
/home/lnsoft/wjj/whisperlivekit/
Dockerfile 文件
FROM nvcr.io/nvidia/pytorch:25.10-py3

# 基础环境
ENV DEBIAN_FRONTEND=noninteractive
RUN apt update && apt install -y \
    ffmpeg \
    && rm -rf /var/lib/apt/lists/*

# Python 常用工具
RUN pip install --upgrade pip setuptools wheel

# ----------------------------------------------------
# 手动安装 torchaudio (Jetson Thor 必须禁用 C++ 扩展)
# ----------------------------------------------------
RUN git clone -b release/2.8 https://github.com/pytorch/audio.git /tmp/audio
WORKDIR /tmp/audio

ENV BUILD_TORIO_PYTHON_EXTENSION=0
ENV BUILD_SOX=1
ENV USE_CUDA=0
ENV USE_STABLE_ABI=0

RUN python setup.py install
RUN rm -rf /tmp/audio

# ----------------------------------------------------
# WhisperLiveKit 及依赖
# ----------------------------------------------------
RUN pip install whisperlivekit --no-deps
RUN pip install tiktoken fastapi uvicorn websockets \
    && pip install --upgrade certifi

# 安装 NeMo(如果你启用 --diarization)
RUN pip install "git+https://github.com/NVIDIA/NeMo.git@main#egg=nemo_toolkit[asr]"

# ----------------------------------------------------
# 容器目录准备
# ----------------------------------------------------
WORKDIR /root
RUN mkdir -p /root/.cache

COPY warmup.wav /root/warmup.wav

COPY .cache/whisper/ /root/.cache/whisper/
COPY .cache/huggingface/ /root/.cache/huggingface/
COPY .cache/matplotlib/ /root/.cache/matplotlib/

# ----------------------------------------------------
# 生成自签名证书(1年有效期)
# ----------------------------------------------------
RUN mkdir -p /root/.cert && \
    openssl req -x509 -newkey rsa:4096 \
      -keyout /root/.cert/key.pem \
      -out /root/.cert/cert.pem \
      -days 365 \
      -nodes \
      -subj "/C=CN/ST=ShanDong/L=JiNan/O=LNSoft/OU=LNSoft/CN=localhost/emailAddress=wjj@163.com"

COPY entrypoint.sh /root/entrypoint.sh
RUN chmod +x /root/entrypoint.sh
ENTRYPOINT ["/root/entrypoint.sh"]
entrypoint.sh 文件
#!/usr/bin/env bash

MODEL="${MODEL:-small}"
PORT="${PORT:-8000}"
LANG="${LANG:-zh}"
DIAR="${DIAR:-false}"

EXTRA_ARGS=()
if [[ "$DIAR" == "true" || "$DIAR" == "1" ]]; then
    EXTRA_ARGS+=("--diarization")
fi

exec whisperlivekit-server \
    --model "$MODEL" \
    --host 0.0.0.0 --port "$PORT" \
    --ssl-certfile /root/.cert/cert.pem \
    --ssl-keyfile /root/.cert/key.pem \
    --language "$LANG" \
    --init-prompt "大家好,我们要开始开会了。" \
    --warmup-file /root/warmup.wav \
    "${EXTRA_ARGS[@]}"
构建镜像
docker build -t wangjunjian/whisperlivekit:latest .
运行镜像
- 默认模型为
small
docker run -it --rm \
    --ipc=host \
    --net=host \
    --runtime=nvidia \
    wangjunjian/whisperlivekit
- 指定模型为
large-v3-turbo
docker run -it --rm \
    --ipc=host \
    --net=host \
    --runtime=nvidia \
    -e MODEL=large-v3-turbo \
    wangjunjian/whisperlivekit
- 启用
diarization
docker run -it \
    --ipc=host \
    --net=host \
    --runtime=nvidia \
    -e MODEL=large-v3-turbo \
    -e PORT=8000 \
    -e LANG=zh \
    -e DIAR=true \
    wangjunjian/whisperlivekit
迁移 WhisperLiveKit 镜像
保存镜像
docker save wangjunjian/whisperlivekit -o whisperlivekit.tar
加载镜像
docker load -i whisperlivekit.tar
Python 调用 WhisperLiveKit 服务
准备音频文件
查看音频文件信息
file asr_example.wav guess_age_gender.wav output.wav test.wav
asr_example.wav:      RIFF (little-endian) data, WAVE audio, Microsoft PCM, 16 bit, mono 16000 Hz
guess_age_gender.wav: RIFF (little-endian) data, WAVE audio, Microsoft PCM, 16 bit, mono 48000 Hz
output.wav:           RIFF (little-endian) data, WAVE audio, Microsoft PCM, 16 bit, mono 24000 Hz
test.wav:             RIFF (little-endian) data, WAVE audio, Microsoft PCM, 16 bit, mono 16000 Hz
采样率(sample rate)不同(16k / 24k / 48k),不能直接合并,否则会出现合并后的语音模糊不清。
统一音频格式
合并前,先把所有音频文件转换为 16k 采样率的单声道 16 位 PCM 格式。
mkdir -p clean
for f in *.wav; do
  ffmpeg -y -i "$f" -ar 16000 -ac 1 -sample_fmt s16 "clean/$f"
done
生成拼接列表文件
ls clean/*.wav | sed "s/^/file '/;s/$/'/" > mylist.txt
这行命令生成一个文本文件 mylist.txt,格式为:
file 'clean/asr_example.wav'
file 'clean/guess_age_gender.wav'
file 'clean/output.wav'
file 'clean/test.wav'
拼接音频文件
ffmpeg -f concat -safe 0 -i mylist.txt -ar 16000 -ac 1 -sample_fmt s16 all.wav
使用 WebSocket API
#!/usr/bin/env python3
"""
simple_transcription_example.py

用途:
    根据服务器 config 自动选用发送格式(webm vs PCM)。用于把本地 WAV 文件上传到 WhisperLiveKit
    并等待转写结果(以兼容 web UI 的行为)。

用法:
    python simple_transcription_example.py test.wav --server wss://127.0.0.1:8000/asr

依赖:
    pip install websockets numpy
    系统需安装 ffmpeg (仅当服务器要求 webm 时需要)

说明:
    - 脚本会在建立 WebSocket 后先读取首个 JSON 消息(server config)
      依据 useAudioWorklet 字段选择发送方式:
        * useAudioWorklet == False  -> 把 wav 转成 webm/opus(使用 ffmpeg),按小块发送二进制 blob(模拟 MediaRecorder)
        * useAudioWorklet == True   -> 发送归一化 float32 PCM 数据(短帧)
"""

import asyncio
import websockets
import json
import sys
import ssl
import wave
import numpy as np
import logging
import argparse
import tempfile
import subprocess
import os
import time

logging.basicConfig(level=logging.INFO)
logger = logging.getLogger("simple_transcription_example")

def resample_to_rate(samples: np.ndarray, orig_rate: int, target_rate: int):
    if orig_rate == target_rate:
        return samples
    ratio = target_rate / orig_rate
    new_length = int(len(samples) * ratio)
    x_old = np.linspace(0, len(samples) - 1, len(samples))
    x_new = np.linspace(0, len(samples) - 1, new_length)
    res = np.interp(x_new, x_old, samples).astype(np.int16)
    return res

async def wait_for_config(ws, timeout=5.0):
    """等待服务器的首个 JSON 消息(config),返回解析后的 dict 或 None"""
    try:
        raw = await asyncio.wait_for(ws.recv(), timeout=timeout)
    except asyncio.TimeoutError:
        return None
    try:
        data = json.loads(raw)
        return data
    except Exception:
        return None

async def send_webm_bytes(ws, webm_path, chunk_bytes=64*1024, delay=0.05):
    """把 webm 文件以若干二进制块发送,最后发送空二进制表示结束(模拟 MediaRecorder -> Blob 时序)"""
    logger.info(f"Sending webm audio from {webm_path} in chunks of {chunk_bytes} bytes")
    with open(webm_path, "rb") as f:
        while True:
            b = f.read(chunk_bytes)
            if not b:
                break
            await ws.send(b)
            await asyncio.sleep(delay)
    # send empty blob / end signal
    await ws.send(b"")
    logger.info("Sent end-of-stream signal (empty blob)")

async def send_pcm_float32(ws, audio_array: np.ndarray, sample_rate: int, chunk_ms=40, delay=0.02):
    """发送归一化 float32 PCM bytes(little endian)。audio_array 应为 int16 原始样本"""
    logger.info("Sending float32 PCM frames")
    # normalize int16 -> float32 [-1,1]
    if audio_array.dtype.kind in ("i","u"):
        maxv = np.iinfo(audio_array.dtype).max
        f = (audio_array.astype(np.float32) / float(maxv))
    else:
        f = audio_array.astype(np.float32)
    samples_per_chunk = int(sample_rate * chunk_ms / 1000)
    for i in range(0, len(f), samples_per_chunk):
        chunk = f[i:i+samples_per_chunk].astype(np.float32).tobytes()
        await ws.send(chunk)
        await asyncio.sleep(delay)
    await ws.send(b"")
    logger.info("Sent end-of-stream signal (empty)")

def wav_to_webm_ffmpeg(wav_path: str, out_webm_path: str, bitrate="64k"):
    """用 ffmpeg 转码 wav -> webm (opus). 返回输出路径。抛出异常表示失败"""
    cmd = [
        "ffmpeg",
        "-y",
        "-hide_banner",
        "-loglevel", "error",
        "-i", wav_path,
        "-c:a", "libopus",
        "-b:a", bitrate,
        "-vbr", "on",
        "-application", "audio",
        "-f", "webm",
        out_webm_path,
    ]
    logger.info("Running ffmpeg to generate webm: " + " ".join(cmd))
    proc = subprocess.run(cmd, stdout=subprocess.PIPE, stderr=subprocess.PIPE)
    if proc.returncode != 0:
        raise RuntimeError(f"ffmpeg failed: {proc.stderr.decode(errors='ignore')}")
    return out_webm_path

async def transcribe_file(wav_path: str, server_url: str):
    # read wav basic info
    with wave.open(wav_path, "rb") as wf:
        channels = wf.getnchannels()
        sample_width = wf.getsampwidth()
        frame_rate = wf.getframerate()
        n_frames = wf.getnframes()
        raw = wf.readframes(n_frames)
        logger.info(f"WAV: {channels}ch, {sample_width} bytes, {frame_rate}Hz, {n_frames} frames")

        if sample_width == 2:
            dtype = np.int16
        elif sample_width == 1:
            dtype = np.uint8
        elif sample_width == 4:
            dtype = np.int32
        else:
            raise RuntimeError("Unsupported sample width")
        audio = np.frombuffer(raw, dtype=dtype)
        if channels == 2:
            # Convert stereo to mono by averaging channels
            audio = audio.reshape(-1, 2).mean(axis=1).astype(dtype)

    # SSL context (ignore certs for local dev)
    ssl_context = ssl.SSLContext(ssl.PROTOCOL_TLS_CLIENT)
    ssl_context.check_hostname = False
    ssl_context.verify_mode = ssl.CERT_NONE

    logger.info(f"Connecting to {server_url}")
    async with websockets.connect(server_url, ssl=ssl_context) as ws:
        logger.info("Connected, waiting for server config (timeout 5s)...")
        cfg = await wait_for_config(ws, timeout=5.0)
        if cfg:
            logger.info(f"Server config: {cfg}")
        else:
            logger.warning("No config received in time; defaulting to webm mode")
            cfg = {}

        use_worklet = bool(cfg.get("useAudioWorklet"))
        if not use_worklet:
            # server expects MediaRecorder webm blobs
            # 转码 wav -> webm (ffmpeg) 到临时文件
            tmp = tempfile.NamedTemporaryFile(suffix=".webm", delete=False)
            tmp.close()
            try:
                wav_to_webm_ffmpeg(wav_path, tmp.name)
            except Exception as e:
                os.unlink(tmp.name)
                raise
            try:
                await send_webm_bytes(ws, tmp.name, chunk_bytes=64*1024, delay=0.05)
            finally:
                try:
                    os.unlink(tmp.name)
                except Exception:
                    pass
        else:
            # server expects worklet PCM: send float32 PCM (normalized)
            target_rate = cfg.get("sample_rate", 16000)
            if frame_rate != target_rate:
                logger.info(f"Resampling from {frame_rate} to {target_rate}")
                audio16 = resample_to_rate(audio.astype(np.int16), frame_rate, target_rate)
            else:
                audio16 = audio.astype(np.int16)
            await send_pcm_float32(ws, audio16, sample_rate=target_rate, chunk_ms=40, delay=0.02)

        # receive transcription results until ready_to_stop or timeout

        # 使用字典来存储和更新基于开始时间的段落
        confirmed_segments = {}

        logger.info("Audio sent; receiving server messages...")
        while True:
            try:
                msg = await asyncio.wait_for(ws.recv(), timeout=60.0)
            except asyncio.TimeoutError:
                logger.warning("Timeout waiting for server replies")
                break
            try:
                data = json.loads(msg)
            except Exception:
                logger.info("Received non-json message")
                continue
            # logger.info(f"Server -> {data}")

            if data.get("type") == "ready_to_stop":
                logger.info("Server indicated ready_to_stop")
                continue # break

            status = data.get("status")
            if status == "no_audio_detected":
                logger.warning("Server reports no_audio_detected")
                # continue to read in case more messages arrive
                continue # 如果没有音频,跳过段落处理

            lines = data.get("lines", []) or []

            # 1. 收集当前服务器响应中所有段落的起始时间键
            current_starts = {ln.get("start") for ln in lines if ln.get("start")}

            # 2. 找出需要删除的旧键
            # 如果已记录的段落起始时间不在当前服务器返回的列表中,则认为它已被合并或过时,应被删除。
            keys_to_delete = set()
            for existing_start_time_str in confirmed_segments.keys():
                if existing_start_time_str not in current_starts:
                     keys_to_delete.add(existing_start_time_str)

            # 3. 执行删除
            for key in keys_to_delete:
                del confirmed_segments[key]
                logger.debug(f"Removed segment with start key: {key}") # 辅助调试

            # 4. 更新/插入新的段落
            for ln in lines:
                text = ln.get("text", "").strip()
                start_time_str = ln.get("start")

                # 仅处理包含文本和开始时间的段落
                if text and start_time_str:
                    confirmed_segments[start_time_str] = text

        # 整理最终结果:按开始时间排序并提取文本
        final_lines = []

        # 排序是基于时间字符串进行的,这对于格式如 '0:00:05' 通常是有效的。
        # 如果时间格式更复杂(如包含毫秒),可能需要转换为浮点数再排序。
        # 目前假设字符串排序足够。
        for start_time_str in sorted(confirmed_segments.keys()):
            final_lines.append(confirmed_segments[start_time_str])

        return final_lines # 返回去重和排序后的结果

def parse_args():
    p = argparse.ArgumentParser()
    p.add_argument("wav", help="Path to WAV file")
    p.add_argument("--server", default="wss://127.0.0.1:8000/asr")
    return p.parse_args()

if __name__ == "__main__":
    args = parse_args()
    try:
        results = asyncio.run(transcribe_file(args.wav, args.server))
        print("\n===== TRANSCRIPT =====")
        for r in results:
            print(r)
    except Exception as e:
        logger.exception("Failed")
        sys.exit(1)
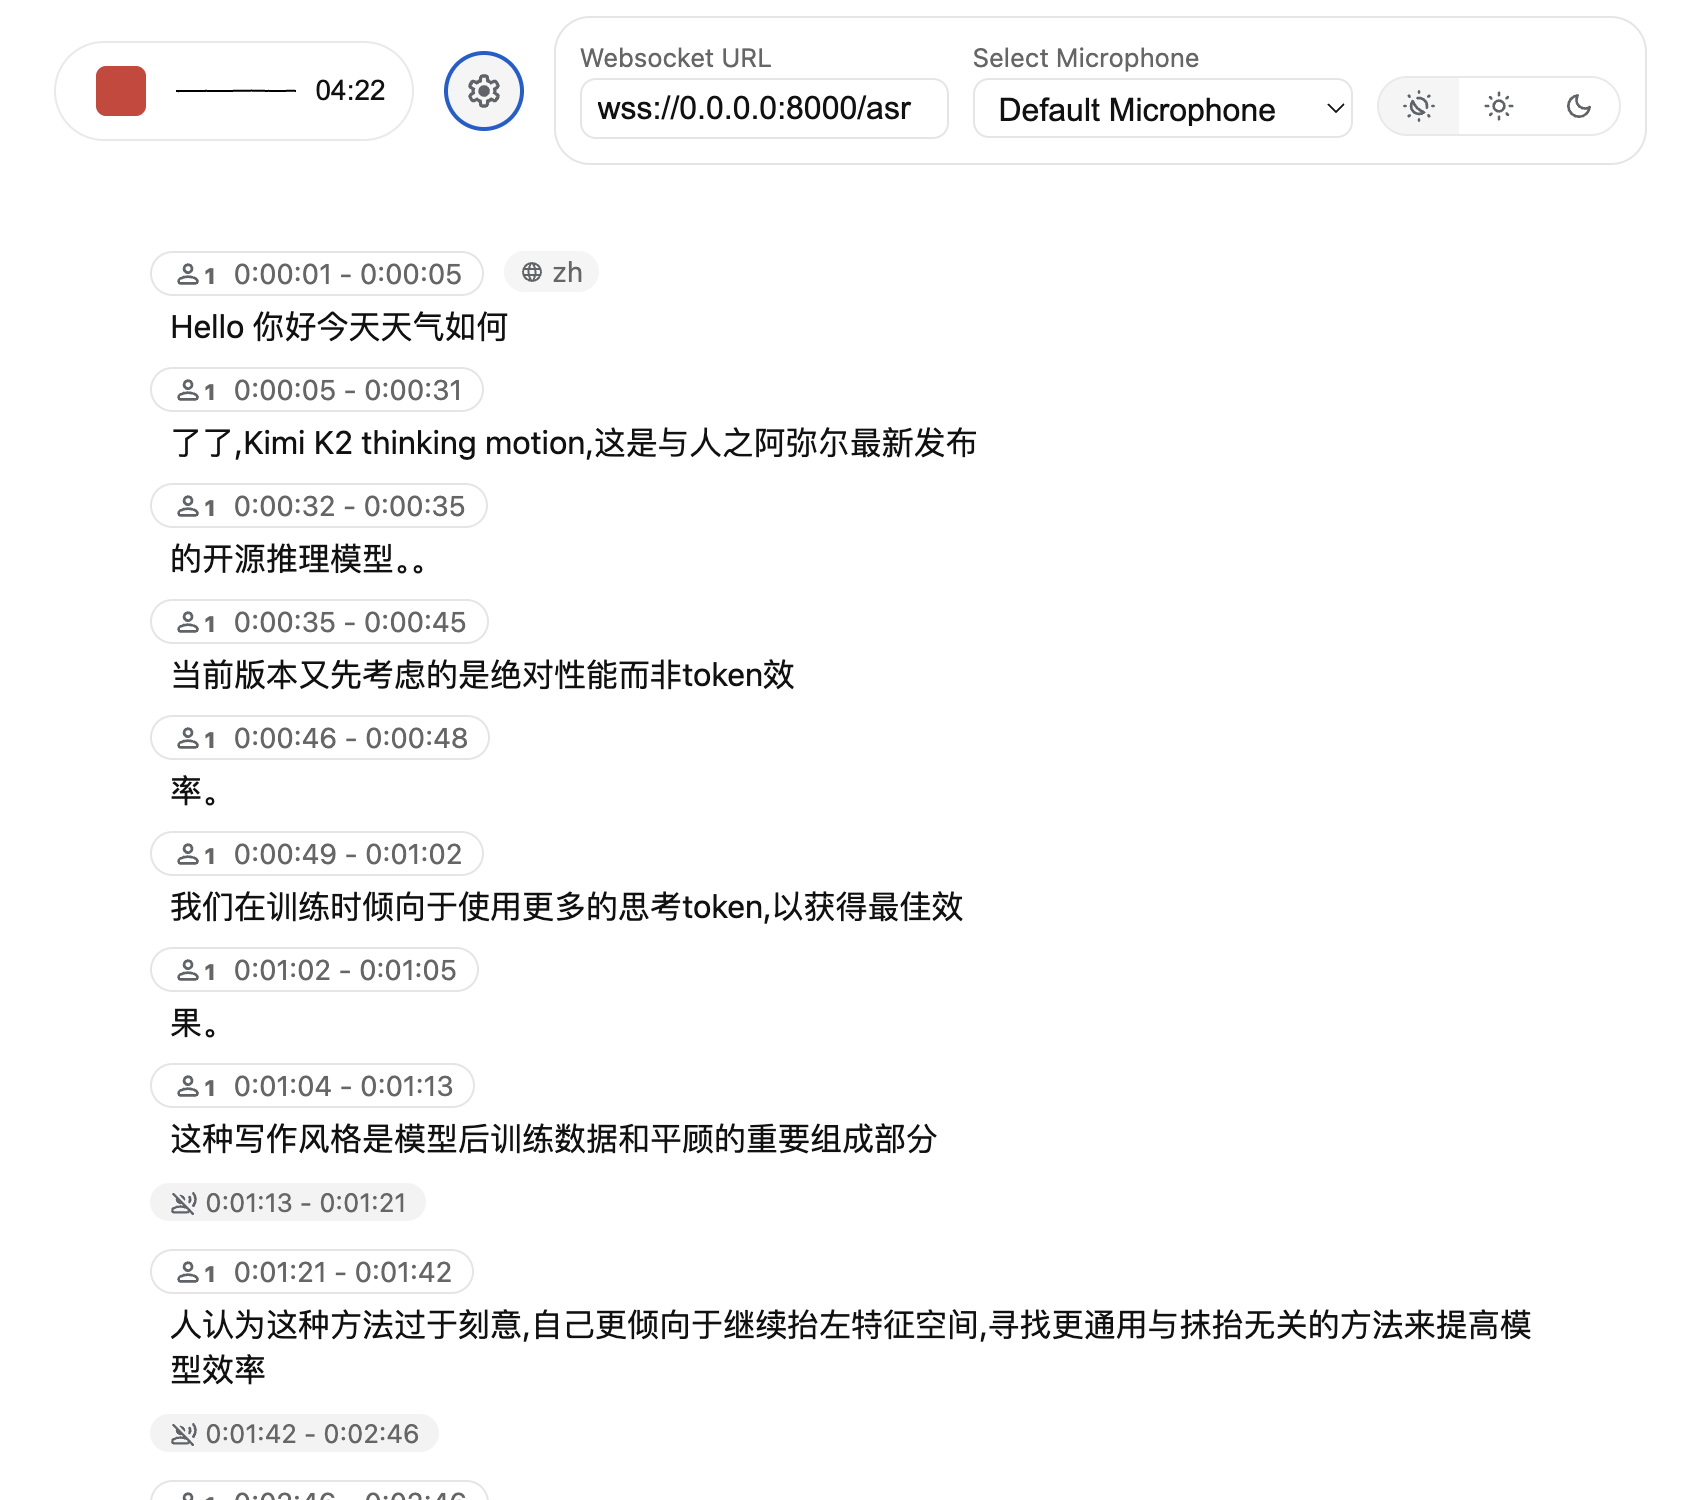
部署 WhisperLiveKit 服务(whisper small)
whisperlivekit-server --model small \
    --host 0.0.0.0 --port 8000 \
    --ssl-certfile .cert/cert.pem \
    --ssl-keyfile .cert/key.pem \
    --diarization \
    --language zh
运行 simple_transcription_example.py
python simple_transcription_example.py all.wav
欢迎大家来体验打摩院推出的语音识别模型。
I heard that you can understand what people say, and even though they are agent-gender, so can you guess my agent-gender from my voice?你好,欢迎使用百度飞奖深度学习框架。格兰发布了一份主题为宣布即将对先进半导体知道设备台取得出口管制措施的公告表示,坚于技术的发展和地缘政治的背景,
部署 WhisperLiveKit 服务(whisper large-v3-turbo)
whisperlivekit-server --model large-v3-turbo \
    --host 0.0.0.0 --port 8000 \
    --ssl-certfile .cert/cert.pem \
    --ssl-keyfile .cert/key.pem \
    --diarization \
    --language auto
运行 simple_transcription_example.py
python simple_transcription_example.py all.wav
欢迎大家来体验达摩院推出的语音识别模型。
我听了你们能理解什么人说的,而且虽然他们是老年纪和男性。所以,你们能够猜我老年纪和男性的声音吗?你好,欢迎使用百度非讲深度学习框架。格兰发布了一份主题为宣布即将对仙境半导体制造设备采取的出口管制措施的公告表示,监狱技术的发展和地缘政治的背景,
这里的一段英文语音自动翻译为了中文